
I submitted an assignment recently on this topic. This is how I made an LED to blink using an Arduino:
Step #1: Connecting an LED
- The Arduino board comes with an LED pre-installed. It’s marked L on the board and is connected to pin number 13. The Arduino board uses this LED to show if your code, or sketch, is running properly.
- There are also two additional LEDs, marked RX and TX, pre-installed on Arduino board; these flashes every time a byte is sent or received by the board (see the first image). When you upload your software they will flicker.
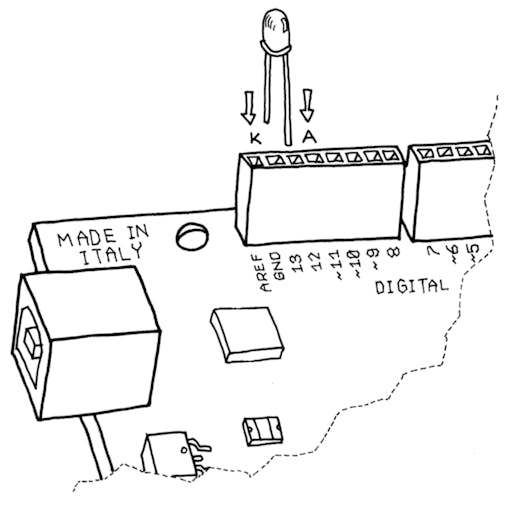
- We suggest that you add your own LED (of any color) to create a bigger blinking light! Connect it as shown in the second image. Be sure to plug it into the pin hole that is labeled 13. K indicates the cathode (negative), or shorter leg; A indicates the anode (positive), or longer leg. Note that the term “lead” is also used to refer to an LED’s leg.


Step #2: Creating Your Code
- Once the LED is connected, you need to tell Arduino what to do. This is done through code: a list of instructions that you give the microcontroller to make it do what you want. The words code, program, and sketch are terms that can be used interchangeably.
- On your computer, run the Arduino IDE (on the Mac, it should be in the Applications folder; on Windows, the shortcut will be either on your desktop or in the Start menu).
- Select File→New. (The first time you save your file, you’ll be asked to choose a sketch folder name: this is where your Arduino sketch will be stored).
- Name it Blinking_LED and click OK.
- Alternatively,i used this code.You can also load this sketch

Step #3: Checking Your Code
- Now that the code is in your IDE, you need to verify that it is correct.
- Click the Verify button (see above image for where this button is located).
- If everything is correct, you’ll see the message “Done compiling” appear at the bottom of the Arduino IDE. This message means that the Arduino IDE has translated your sketch into an executable program that can be run by the board, a bit like an .exe file in Windows or an .app file on a Mac.
- Troubleshooting: If you get an error, most likely you made a mistake typing in the code. Look at each line very carefully and check each and every character, especially symbols like parentheses, braces, semicolons, and commas. Make sure you’ve copied uppercase and lowercase faithfully, and that you’ve used the letter O and the number 0 correctly.

Step #4: Uploading Your Code to Your Arduino Board
- Once your code verifies correctly, you can upload it into the board by clicking the Upload button (see above image for where this button is located).
- This will tell the IDE to start the upload process, which first resets the Arduino board, forcing it to stop what it’s doing and listen for instructions coming from the USB port. The Arduino IDE will then send the sketch to the Arduino board, which will store the sketch in its permanent memory.
- Troubleshooting: If you get an error uploading to your Arduino board it may be related to how you installed the Arduino IDE. Refer to the section in Chapter 3 starting with “The Software Integrated Development Environment (IDE)” for guidance.
Step #5: Your Code At Work!
- Once the IDE has sent the entire sketch, the Arduino board will start running your sketch. This happens fairly quickly. If you keep your eyes on the bottom of the Arduino IDE, you will see a few messages appear in the black area at the bottom of the window, and just above that area, you might see the message “Compiling,” then “Uploading,” and finally “Done uploading” to let you know the process has completed correctly.
- Assuming that the sketch has been uploaded correctly, you will see the LED L turn on for a second and then turn off for a second. If you installed your own LED, that LED will blink too. What you have just written and run is a computer program, or sketch.
- Once the code is in your Arduino board, it will stay there until you put another sketch on it. The sketch will survive if the board is reset or turned off, a bit like the data on your computer’s hard drive.
- Troubleshooting
- If you don’t see the LEDs flicker, or if you get an error message instead of “Done uploading,” then there is a communication problem between your computer and Arduino.
- Make sure you’ve selected the right serial port in the Tools→Serial Port menu. Also, check the Tools→Board menu to confirm that the model of Arduino you are using is selected there.
- If you installed your own LED, and it’s not blinking, take it out and twist it 180 degrees to ensure you have the right legs in the right place.

